New bridge for soprano uke

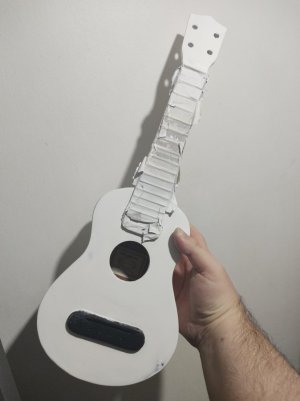
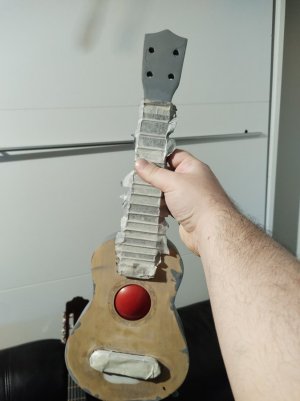
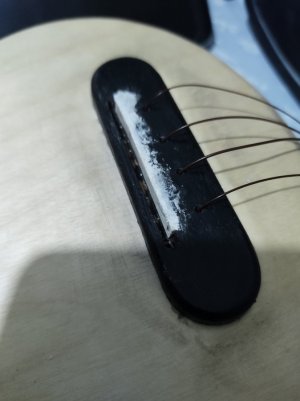
hello, I have been able to fill the bridge holes with some epoxy and made new holes with the same string distance space from the old screwed bridge, plus a new hole for the piezo pickup, still thank you for sharing your experience and your help :)
View attachment 162575View attachment 162576View attachment 162577View attachment 162578

Now I have to attach it to the soprano's body. I still have some tape left for the old bridge position, but considered the old bridge wasn't attached correctly to the body, I want to try to calculate the new bridge position to see if it matches the old one.

My only doubt is the bridge compensation, which I am struggling to understand of how it works and how to calculate it.

Let's say for example I know the distance from the nut to the saddle, let's say 33cm. Is the compensation of the saddle an addition in mm of the previous mentioned distance?

Or the compensation is the adjustment of the action of the saddle?

Or it means both?
The short answer is yes.
 
thank you guys, I checked the old bridge position and saw that it was a bit up to the position I have calculated (plus a 1.5mm for the compensation). This let me think maybe that was one of the reasons why the action of the strings was high.

I have glued the new bridge I customised, and hopefully I will be able to play some chords soon to check the instrument sound and the action with the piezo pickup installed
 

Attachments

  • IMG_20231210_174000708.jpg
    IMG_20231210_174000708.jpg
    76.6 KB · Views: 28
thank you guys, I checked the old bridge position and saw that it was a bit up to the position I have calculated (plus a 1.5mm for the compensation). This let me think maybe that was one of the reasons why the action of the strings was high.

I have glued the new bridge I customised, and hopefully I will be able to play some chords soon to check the instrument sound and the action with the piezo pickup installed
I like your clamping arrangement. File that under "whatever works" (y)
 
Hello guys, I completely forgot to publish all the progress. I had to make some changes to the bridge because of the piezo to install. I also added other pics of other steps I have done before finishing the project:
 

Attachments

  • IMG_20240106_204526258.jpg
    IMG_20240106_204526258.jpg
    50.8 KB · Views: 8
  • IMG_20240104_115723125.jpg
    IMG_20240104_115723125.jpg
    64.1 KB · Views: 5
  • IMG_20240104_194159347.jpg
    IMG_20240104_194159347.jpg
    68.4 KB · Views: 5
  • IMG_20240103_221009351.jpg
    IMG_20240103_221009351.jpg
    60.8 KB · Views: 5
  • IMG_20240103_181946325.jpg
    IMG_20240103_181946325.jpg
    68.1 KB · Views: 5
  • IMG_20231228_170104683.jpg
    IMG_20231228_170104683.jpg
    94 KB · Views: 5
  • IMG_20231228_165830620.jpg
    IMG_20231228_165830620.jpg
    141 KB · Views: 5
  • IMG_20231227_181436735.jpg
    IMG_20231227_181436735.jpg
    67.7 KB · Views: 5
  • IMG_20231222_195137275.jpg
    IMG_20231222_195137275.jpg
    73.2 KB · Views: 5
  • IMG_20231212_203819336.jpg
    IMG_20231212_203819336.jpg
    55.5 KB · Views: 5
  • IMG_20231206_105213687.jpg
    IMG_20231206_105213687.jpg
    66.6 KB · Views: 4
  • IMG_20231205_205249648.jpg
    IMG_20231205_205249648.jpg
    72 KB · Views: 4
  • IMG_20231208_195556328.jpg
    IMG_20231208_195556328.jpg
    66.3 KB · Views: 4
  • IMG_20231213_100951478.jpg
    IMG_20231213_100951478.jpg
    86.6 KB · Views: 4
  • IMG_20231217_110237290.jpg
    IMG_20231217_110237290.jpg
    61.3 KB · Views: 5
  • IMG_20240109_231432860.jpg
    IMG_20240109_231432860.jpg
    91.8 KB · Views: 7
And here the completed ukulele with few tests I did. Thank you all for your help! :) Now it's time for learning! 🤟
 

Attachments

  • resized.mp4
    2.2 MB
  • resizedd.mp4
    1.6 MB
  • lv_0_20240319211524.mp4
    7.5 MB
  • IMG_20240319_205953131.jpg
    IMG_20240319_205953131.jpg
    52.2 KB · Views: 7
  • IMG_20240319_210017599.jpg
    IMG_20240319_210017599.jpg
    44 KB · Views: 7
Top Bottom