First try, finishing question

newbielele

New member
Joined
Feb 1, 2024
Messages
4
Reaction score
1
Hello to everyone.
I am building a concert ukulele for my daughter. It is my first build, and I don't have any experience from any other similar job.
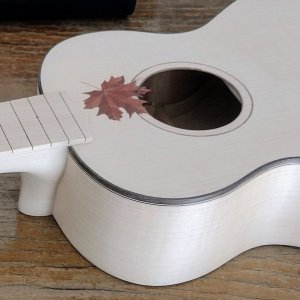
The ukulele is all made from maple, except an inlay on the top, cut from a reddish veneer.
Here is my question:
When sanded, this veneer produces a very red sawdast. I had in mind to use tru-oil for the finish as I read it is a relative easy and forgiving material.
In this case, if/when I sand between coats, is there a way to deal with the messy red dust and stop it from coloring the area around the inlay;
I mean in bare wood the dust fogs red the maple all around, but it can be blowned away. But after the oil coat, wouldn't the dust stick an color the top;
Thank you for your time, it is a great place you have here and I should have enter it earlier. It would have save me from a lot of mistakes and troubles...
This is the inlay:

Ps. Forgive my English, it is not my native langauge
 

Attachments

  • IMG_20240205_103612589~3.jpg
    IMG_20240205_103612589~3.jpg
    106.9 KB · Views: 37
After finish sanding (and cleaning), I would typically seal with a couple applications of dilute shellac. They dry so fast that I would expect minimal migration of color into the maple. Once sealed, you can build finish via whatever method you choose, including Tru-Oil. You will build many layers of cured finish before sanding, and you should avoid sanding all the way back to the wood surface, so I don't see any issue with later color migration.
 
Thanks for posting and welcome to UUF! I’m impressed with the maple leaf detail.

You should be able to remove residual dust by wiping all surfaces with a damp, lint-free cloth. And, just before applying the Tru Oil, I’d use a DRY lint- free cloth to wipe it down again. I suggest that you finish with at least one coat of a clear spray sealant such as Rust-O-Leum 2X Ultra Cover.
 
Thank you both for taking the time to answer my question.
I had the (obviously wrong) idea that tru-oil should be applied straight on the bare wood. I will follow your suggestion to use a "drying" undercoat, either shellac or a spay sealant.
I’m impressed with the maple leaf detail.
Thank you. Then inlay wasn't in my plan, I did it to hide a messup I created when cutting the sound hole. And finally it didn't prove to be a good idea...
It would have been less trouble and more honest and right to redo the front.
 
You don’t have to seal the wood in order to use tru-oil. But if you seal the wood, it will be easier to build up the finish as the oil won’t keep getting absorbed by the wood. Shellac or vinyl sealer will do. My advice is to spend some time making sure the wood is well sanded and there are no scratches as the finish will expose everything. Sand lightly with direction of the grain. 220 grit is enough for a last grit. After applying the seal coat or in between coats of oil you don’t need to do a lot of sanding. All you need is to scuff the prior layer. 320 or 400 grit is sufficient. Remember, you are not sanding the finish smooth, just creating a rough surface for better finish adhesion.
Take your time and put on as many layers as you can. Very light layers that should be totally flat without runs or high spots. Apply the oil and wipe off the excess. Repeat over and over. Not sure how many layers but definitely over 12. Some people I know will apply 20 plus layers of try-oil without sanding in between coats. So I’m not sure it’s a total necessity as new coats will adhere to the prior layer if not totally cured.
Good luck and do share the finished product!
 
Thank you both for taking the time to answer my question.
I had the (obviously wrong) idea that tru-oil should be applied straight on the bare wood. I will follow your suggestion to use a "drying" undercoat, either shellac or a spay sealant.

Thank you. Then inlay wasn't in my plan, I did it to hide a messup I created when cutting the sound hole. And finally it didn't prove to be a good idea...
It would have been less trouble and more honest and right to redo the front.
I respectfully disagree about fixing your mistake in such a beautiful way. I’m no luthier but many beautiful, notable and innovative designs (for musical instruments and otherwise) have originated as a mistake caused by the slip of a hand, etc.
Also, it’s a great, honest story behind a beautiful gift.
 
Take a look at the soundboard of my one and only soprano uke which I built from a cheap veneer Amazon kit two years ago.
I patterned it after the Kenny Hill uke called “Yowl-A-Lele” which had artwork by Robert Armstrong.
My point in sharing this is that Kenny’s 1971- copyrighted original uke had a custom- cut sound hole that mirrors the oblong (cattywampus) position of the tomcat’s open mouth and all four of its sharp teeth extend into the hole’s profile.
Though the unconventional sound hole was one of the primary factors I found appealing, I have yet to muster sufficient courage (nor to determine the suitable tool to use) to make that Final Cut.
1707160059851.jpeg
 
Last edited:
Very useful advice Cornerstone!
I thought I had to do only two to three coats of tru-oil....
For the sealing layer I order blond shellac flakes. Never used this material before, so it a good opportunity to try it.
The other color shellac i found available was too dark I think. I like the natural look of maple. I t has a very fine pink hue.
Great advice , thank you sirs!

Ps I also found in the forum that is preferable to finish the fretboard only with wax
Something like carnauba furniture wax I suppose...
 
Yes, mask the fretboard and don’t apply any finish on it. After the setup is done you can wipe with fretboard oil or mineral oil.
 
I diluted the shellac and it is ready for use, but I postpone the finishing because I decide to change the bridge design.
The initial plan was for a tie bridge. After reading the forum I change my mind and I will go for a slotted bridge. I am thinking maple 60mm*18mm*9mm (L*W*H). Are these dimensions ok;
The soundboard has a patch (100*27*1,7mm) underside the bridge area.
 
Last edited:
Top Bottom