Stew Mac Concert Build

Moving ahead.

First coat of poly wipe on. I should get at least one more coat on today. It was tricky dealing with the peghead even with the dowl but I got it done without dropping it. I hope to have the same success with the next few coats.

I used an old tshirt but still got a bit of trash in the finish that I was able to quickly pick back out. SM recommends a foam brush for the next few coats. Of course, that is with their finishes that they sell so my results may vary.


IMG_6764.JPG

IMG_6765.JPG
 
I changed the way I am applying the wipe on poly. I am no longer hanging as before and no longer apply the poly all in one step. Instead, we clamped up some scrap wood to the table so that I can lay the ukulele on whatever angle works. This is working really well for me. I ditched the foam brush and just did the wipe on with an old tee that I snitched from the hubbys drawer. I am now getting minimal to no bubbles (y)

The back I had/wanted to lay on pretty thick to fill the deep grain. Most probably would have sanded but I was worried about sanding through. I think I applied 5 coats (2 with a foam brush) to the back.

I have the back, neck and sides done. I plan on 4 coats for the top and then on to gluing the bridge possibly Sunday or Monday. It's getting closer. I am actually entertaining the idea that I may be able to learn to play it.

IMG_0996.JPG
 
I changed the way I am applying the wipe on poly. I am no longer hanging as before and no longer apply the poly all in one step. Instead, we clamped up some scrap wood to the table so that I can lay the ukulele on whatever angle works. This is working really well for me. I ditched the foam brush and just did the wipe on with an old tee that I snitched from the hubbys drawer. I am now getting minimal to no bubbles (y)

The back I had/wanted to lay on pretty thick to fill the deep grain. Most probably would have sanded but I was worried about sanding through. I think I applied 5 coats (2 with a foam brush) to the back.

I have the back, neck and sides done. I plan on 4 coats for the top and then on to gluing the bridge possibly Sunday or Monday. It's getting closer. I am actually entertaining the idea that I may be able to learn to play it.

View attachment 168666
I've been watching this and love it! I'm living vicariously throughout your build; I've wanted to do this for so long but can neither afford a Stew Mac kit nor have the space and tools to achieve a satisfactory build.

Looks so fab! Congrats!
 
I plan on 4 coats for the top and then on to gluing the bridge possibly Sunday or Monday.

My only advice would be to put the minimum poly wipe on the top that you can get away with. Too much finish can kill the tone.

My brother, who knows nothing about music or playing the guitar, brought home this gorgeous guitar that had at least a 1/8 inch or more nitro lacquer on the top and buffed to a mirror sheen. Boy did it look good in the guitar store hanging there on the wall all shiney. Problem was it was incredibly dead sounding. Muffled because all that lacquer killed the vibration and sound. In the end he didn't care because he never did learn to play the thing and it looks great hanging on his wall.
 
This has been a fun and informative read for me, I've been interested in these StewMac kits ever since I tried one of those cheapie eBay ukulele kits that most put together within a day but took me a whole month because I'm a perfectionist. Sorry, run-on sentence :)

This would be the next step up, that's for sure! Looking forward to hearing more (y)
 
The finish turned out really nice and I hope it stands up. I sanded between coats, 220 for the first then 320 and 400 for the remaining. I used 0000 steel wool on the neck because it was a hassle to use flat sandpaper on the round part. I blew the dust off and then used tack cloth before applying each coat.

When I peeled off the tape on the fretboard the next day some finish had found it’s way through. I will gently sand that down enough so it doesn’t show or is just a ghost if it sunk too far in.

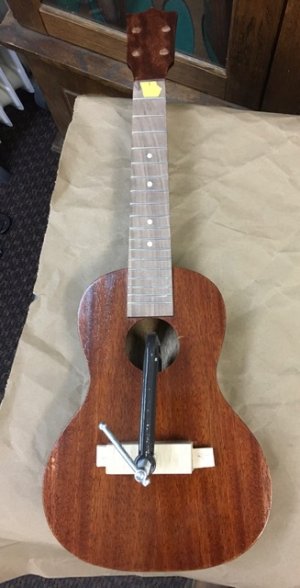
We glued the bridge yesterday and worked on fitting the saddle. A good thing about fitting the saddle is I no longer have to file down my nails 💅.
I applied tape around the saddle after pressing on my shirt to remove some of the tack. I had read somewhere on UU that someone applies 2 layers of tape so the bridge has a bed to nestle into. I liked that idea. After gluing and squishing I wiped squeeze out, clamped, wiped more squeeze out and then added the little wedges under the caul edges like the instructions say to do. We didn’t clamps super tight. Then I crossed my fingers in hopes I did a good job. There has been lots of finger crossing on this build.

The saddle color does not match the nut but it’s probably better material since it was for a Gibson < that’s my take on it. It ain’t easy sanding that little strip by hand. I have to round off the sharp edges this morning. I think it has a good fit now. It’s snug and not at all sloppy like before.

@Farkvam , if you start a build I hope you will post about it 👍

IMG_3841.jpeg
 
That's looking really good!
 
My final picture of the finished ukulele. I still have some bugs to work out.
It does play! I am not sure if it plays well but it does make noise.

I wish to thank all of you that chimed in with suggestions, tips, encouragement and so-forth. This helped me immensely to get this instrument playable.

IMG_6778.jpg

The End
 
Top Bottom