Building a soprano

I said I wouldn’t be using any high quality wood for this first build. And that’s still the case. But I just scored a whole lot of mahogany for basically free. It’s an old table top that I was told was shipped to the US from the UK. Unsure of age or specific species but seems pretty nice.

Depending on the age, quite possibly (probably?) it is Cuban mahogany. At one time Cuban mahogany (Swietenia mahogani) was much more common than so-called "Honduras" mahogany (Swietenia macrophylla). Also of Cuban mahogany at one time they said there is so much we will never run out. They ran out.
 
I’ve worked with mahogany before. This seems far more dense than what I’ve had in the past. It’ll be a while before I mill it but I will share photos when I do
 
I said I wouldn’t be using any high quality wood for this first build. And that’s still the case. But I just scored a whole lot of mahogany for basically free. It’s an old table top that I was told was shipped to the US from the UK. Unsure of age or specific species but seems pretty nice.
Looks like Honduran/Cuban ... a good few sopranos there, ..I use that sort of reclaimed wood all the time (no seasoning issues).
 
Looks like Honduran/Cuban ... a good few sopranos there, ..I use that sort of reclaimed wood all the time (no seasoning issues).
The trick is going to be dialing in my band saw to maximize the wood while resawing. It’s about 3/4 inch thick. I’m not sure how many pieces I can realistically expect to resaw from that thickness. Ideally I could get 4 slices.
 
The trick is going to be dialing in my band saw to maximize the wood while resawing. It’s about 3/4 inch thick. I’m not sure how many pieces I can realistically expect to resaw from that thickness. Ideally I could get 4 slices.
yes 4 slices easy , use a fine kerf blade, saw down the centre into two half slices then saw again into quarters , you should end up with about 3/16" slices ready for thickness sanding.
 
I mentioned I had some CAD knowledge. I'm going to send out to have a few templates laser cut. It may seem crazy to spend on that sort of thing on my first build, but it's really not expensive at all. Especially when compared to what places like Stewmac would charge for this same thing. Look at the image I'm attaching to see the price. And, this is only the first place I've gotten a quote from. There may be cheaper options out there. I used the dimensions of a martin soprano to sketch this. I plan to have the body shape, a fret cutting jig, and a bridge placement template cut for me. If anyone would like the sketch files for these I'll be happy to share then when they are finished.
 

Attachments

  • Screen Shot 2024-01-28 at 11.47.09 AM.png
    Screen Shot 2024-01-28 at 11.47.09 AM.png
    34.9 KB · Views: 77
The laser cut templates finally arrived. Here they are. The body template is resting on top of two pieces of the poplar I’m building with which I used to practice my French polish skills on. The grain won’t be oriented that way for the real build. I’ve opted to try French polish for now because when it’s time to apply the finish I’ll need to work indoors in a room that isn’t very well ventilated. Still working on getting a nice smooth surface.
 

Attachments

  • ECC95CEF-2B19-4D1D-8675-74190ED18F60.jpeg
    ECC95CEF-2B19-4D1D-8675-74190ED18F60.jpeg
    100.8 KB · Views: 38
  • CCDF8820-18E7-4934-B8D5-9FC93E5D13BD.jpeg
    CCDF8820-18E7-4934-B8D5-9FC93E5D13BD.jpeg
    63.7 KB · Views: 39
I’ve opted to try French polish for now because when it’s time to apply the finish I’ll need to work indoors in a room that isn’t very well ventilated. Still working on getting a nice smooth surface.
I love a nice French polish. It looks great
 
Slow progress continues. I got the body form put together yesterday. Finishing this step has gotten me excited. Starting to have tangible progress. Also in small moments here and there I’ve continued to practice French polish. I’m starting to get a better feel for it. I’m finding I get better results with something closer to a 1 pound cut. The image shows my first attempt at French polish compared to my second. It’s a bit had to compare since the color of the wood is so different.

Next step. Thickness top back and sides. Then joint the top plate and back plate.
 

Attachments

  • B99BC40F-8B9F-47CE-8D6D-A3CC1024B760.jpeg
    B99BC40F-8B9F-47CE-8D6D-A3CC1024B760.jpeg
    119.5 KB · Views: 27
  • E33F3456-5238-4882-8313-A8FB77BE2280.jpeg
    E33F3456-5238-4882-8313-A8FB77BE2280.jpeg
    71.5 KB · Views: 34
Last edited:
Looking grid. You might want to consider jointing the top plate and back plate before thicknessing - I find it easier to join the thicker plates.
Thank you for the tip. That’s actually something I wondered about. I’ll take your advice and do the glue joint first.
 
The DIY sander is working like a champ. It’s great for now but I can see myself wanting a real one if build more instruments after this.

I got my top/back sets thinned to around 3mm and have started to glue them up. I’ll do the final thickness sanding later as suggested earlier. Aiming for ~2mm with the assumption that things will thin out further during finish sanding.
 

Attachments

  • A5F70987-88C5-481F-A993-4B8A938C991C.jpeg
    A5F70987-88C5-481F-A993-4B8A938C991C.jpeg
    112.7 KB · Views: 25
  • 1A34FF3C-BF70-48FB-8925-223537701612.jpeg
    1A34FF3C-BF70-48FB-8925-223537701612.jpeg
    121.3 KB · Views: 36
Quick look at the wood sets I’ll be using.
 

Attachments

  • 88F55A05-01AD-4193-A1B9-B44E856ACD01.jpeg
    88F55A05-01AD-4193-A1B9-B44E856ACD01.jpeg
    112.5 KB · Views: 24
  • B6CF8197-8FE5-48C1-A4AB-8B02BB577E94.jpeg
    B6CF8197-8FE5-48C1-A4AB-8B02BB577E94.jpeg
    121.4 KB · Views: 22
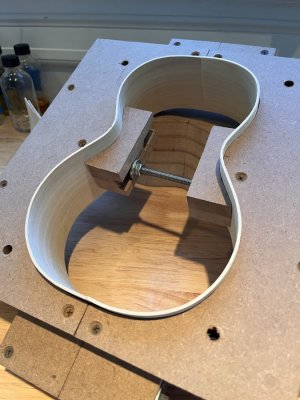
Very slow progress continues. I broke a set of sides and struggled with clamping the bent side into the form to let it dry. I went back to the bench and made a better clamping situation. I made the negative of the outside form -2mm to account for side thickness. I just pulled my first successful side out of the form and bent my second one successfully. Now I need to re-mill a new set of sides to replace the set I broke.6DA535F5-9808-4291-A5D4-826807CCF37F.jpeg9CA3BA6E-A7EB-42B9-881F-1F12A737D49D.jpeg
 
Very slow progress continues. I broke a set of sides and struggled with clamping the bent side into the form to let it dry. I went back to the bench and made a better clamping situation. I made the negative of the outside form -2mm to account for side thickness. I just pulled my first successful side out of the form and bent my second one successfully. Now I need to re-mill a new set of sides to replace the set I broke.View attachment 168986View attachment 168987
I do mine at about 1.6-1.7 mm thick.
 
I do mine at about 1.6-1.7 mm thick.
Does the side thickness have a large impact on the tone of the instrument? I was under the understanding that their primary role in creating the tone of the instrument was to transmit the vibrations of the strings between the top and bottom. So in that sense, a stiffer side would be ideal. Ive read a lot lately about luthiers who are using laminated sides to achieve this.
 
I cannot answer through first hand experience, but was recently talking to a luthier about this. This person's feeling was that that a stiffer back and sides, perhaps even using laminate is a good thing. The theory is that more of the vibration would be present in the top and would not be transferred to the sides.
 
Does the side thickness have a large impact on the tone of the instrument? I was under the understanding that their primary role in creating the tone of the instrument was to transmit the vibrations of the strings between the top and bottom. So in that sense, a stiffer side would be ideal. Ive read a lot lately about luthiers who are using laminated sides to achieve this.
I just copy the old and tested Martin and Island ones from the 1920s …these are not guitars... remember the side are curved/corrighted for strength and stiffness.
 
Top Bottom